

Step by Step Phone Case Replacement for Busy Parents
Every parent faces that split second when a phone slips off the counter as dinner simmers or homework sprawls across the table. A reliable phone case is all that stands between accidental drops and costly repairs, especially when juggling family life in London. This step-by-step guide gives you clear, efficient instructions and highlights the value of a secure, well-fitted case so you can protect your device without letting tech troubles add to the daily chaos.
Table of Contents
- Step 1: Gather The Right Tools And Materials
- Step 2: Remove The Old Phone Case Safely
- Step 3: Clean Your Device Thoroughly
- Step 4: Fit The New Case Securely
- Step 5: Check The Fit And Finish Of The Replacement
Quick Summary
| Key Point | Explanation |
|---|---|
| 1. Collect necessary tools first | Gather your new phone case, phone, lint-free cloth, and optionally a plastic spoon before starting to prevent frustration during the swap. |
| 2. Remove the old case with patience | Gently flex and peel the case from corners, applying steady pressure to avoid damaging your phone or screen during removal. |
| 3. Clean your phone thoroughly | Use a lint-free cloth to clean your phone and ensure it’s dry before fitting the new case, as this prevents dust accumulation. |
| 4. Align the new case properly | Start inserting your phone at the top edge and work downwards, ensuring all cutouts align perfectly for a snug fit and easy access. |
| 5. Inspect the fit post-installation | Conduct a thorough visual inspection to ensure there are no gaps and that all buttons and ports are easily accessible before regular use. |
Step 1: Gather the right tools and materials
Before you touch your phone case, collect everything you need in one spot. This five-minute prep work prevents frustration and keeps you moving quickly through the replacement.
You’ll need surprisingly few items to swap out a phone case successfully. Here’s what to have ready:
- Your new phone case from StudioShake
- Your phone (obviously)
- A soft, lint-free cloth to clean your device
- Optional: a plastic spoon or soft prying tool if your current case is stubborn
The soft cloth matters more than you’d think. Dust trapped between your phone and a new case can scratch the device, so wiping down your phone takes just a moment but prevents damage.
Set up a clean, flat surface where you can work without dropping anything. Your kitchen table works perfectly. Avoid working near edges where your phone could tumble to the floor—busy parents know how quickly accidents happen when you’re juggling multiple tasks.
Check that your new case actually fits your phone model before starting. Nothing’s worse than removing your old case only to discover the replacement doesn’t match your device. Most cases from StudioShake arrive with clear labelling for specific phone models, so double-check the packaging.
Having the right tools ready means you’ll finish the job in under two minutes, even with interruptions from the kids.
If you’re replacing a particularly stubborn case, a plastic spoon works brilliantly for gentle prying. The smooth edge won’t scratch your phone like metal tools might, and you probably have one in your cutlery drawer already. Never use your fingernails or sharp objects—these damage both your case and your device.
Organise your workspace so you’re not fumbling around mid-swap. Put your old case aside so it doesn’t get mixed up with your new one, and position the cloth within arm’s reach.
Pro tip: Lay out all your tools before you start removing the old case, so you’re never searching for something whilst holding your phone.
Step 2: Remove the old phone case safely
Now that your workspace is ready, it’s time to remove your old case without damaging your phone. This step requires patience more than strength, so take your time even if you’re in a rush.
Start by locating where your case grips your phone most tightly. Most cases have the strongest hold around the corners and edges. Gently flex the case slightly to loosen it from the phone’s frame.
Begin peeling from one corner, working your way around the edges slowly. Don’t yank or pull forcefully—consistent, steady pressure works far better than sudden jerks. If the case resists, pause and apply gentle pressure to the next corner rather than forcing one spot.

When following proper case removal techniques, you’ll notice that patience prevents accidental drops and screen damage. Work around all four corners before attempting to remove the case completely from your device.
You may encounter these common challenges:
- Stuck corners that don’t budge easily—apply steady pressure rather than quick jerks
- Dust underneath the case—you’ll wipe this away during the next step
- Protective screen edges that cling to the case—these are designed to grip, so flexibility is key
Once you’ve loosened all corners, gently slide the case away from your phone. If it still resists, work around the edges again instead of forcing it off.
Removing a case takes thirty seconds if you’re patient, but thirty seconds of rough handling can crack your screen.
Set your old case aside immediately so it doesn’t roll off the table or get confused with your new case during the swap. Your phone is now exposed and vulnerable, so keep it centred on your clean work surface away from any edges.
Pro tip: If your case is really stubborn, apply gentle heat by running warm (not hot) water over the case edges for five seconds, which loosens the grip without damaging either the phone or case.
Step 3: Clean your device thoroughly
Your phone is now bare and exposed, making this the perfect moment to clean away dust, fingerprints, and grime that accumulated under your old case. A few minutes of cleaning now means a fresher device inside your new case.
Start by using your lint-free cloth to wipe down the entire phone surface, paying special attention to corners and edges where dust accumulates. Work gently to avoid applying excessive pressure that might damage the screen coating.
For a deeper clean, follow smartphone cleaning techniques that involve warm water and mild soap. Dampen your cloth slightly with warm water and a drop of gentle dish soap, then wipe the back and sides of your phone carefully.
Here’s what to avoid during cleaning:
- Excessive moisture near charging ports or speaker grilles
- Harsh chemicals or abrasive cleaners that damage the oleophobic coating on your screen
- Paper towels that can scratch the glass or leave fibres behind
- Pressurised sprays that force water into delicate components
Allow your phone to air dry completely for at least two minutes before installing your new case. Pay particular attention to any crevices or ports where water might linger. If you used water, this drying time is non-negotiable to prevent moisture damage.
For disinfection, isopropyl alcohol wipes work brilliantly and evaporate quickly without leaving residue. Simply wipe down the entire phone surface with one wipe, then let it dry for thirty seconds.
Clean phones feel fresher in new cases, and the process takes barely five minutes if you work steadily.
Once your phone is dry and clean, you’re ready to slide it into your new StudioShake case. Your device now has a clean foundation, which means your new case will stay fresher for longer.
Pro tip: Clean the charging port with a dry cotton bud before installing your new case, ensuring no lint from cleaning cloths gets trapped inside.
Step 4: Fit the new case securely
Your phone is clean and ready for its fresh protection. Installing your new case correctly ensures maximum protection and a satisfying snug fit that lasts.
Start by aligning your case carefully with your phone’s edges and corners. Position the case so all port cutouts line up perfectly with your charging port, headphone jack (if applicable), and speaker grille before pressing down.
When using
Follow these steps for a secure fit:
- Align the top edge first and slide it into the case opening
- Work your way down one side, pressing gently but firmly
- Move to the opposite side and repeat the process
- Check that button and port cutouts align perfectly with your phone’s features
- Press all edges down until you hear or feel a satisfying snap
Different case materials require slightly different techniques. Silicone cases stretch easily and accept your phone readily, whilst hard plastic cases demand more deliberate pressure to seat properly.
Here is a summary of how different phone case materials affect installation and removal:
| Case Material | Flexibility | Ease of Removal | Installation Tips |
|---|---|---|---|
| Silicone | Very flexible | Easiest, stretches well | Insert one edge first, press gently |
| Hard plastic | Rigid, less flexible | May require more effort | Apply even pressure along all sides |
| Leather/Fabric | Semi-flexible | Moderate, gentle bends | Ensure case aligns perfectly |
| Hybrid (TPU+PC) | Some flexibility | Can be tricky at corners | Warm slightly for easier fitting |
Press around all four edges to ensure your phone sits flush within the case. The case should feel snug but never require excessive force that might damage your phone or strain the case material itself.
A properly fitted case takes about two minutes to install and protects your phone from every angle.
Test the fit by gently holding your phone with the case and tilting it. Your phone shouldn’t move or rattle inside the case, and all buttons should respond crisply when pressed through the case material.
Pro tip: If your case feels too tight, try warming it slightly under warm (not hot) running water for ten seconds to make the material more flexible, then install your phone whilst it’s still warm.
Step 5: Check the fit and finish of the replacement
Your new case is installed, but taking a moment to inspect it properly ensures your phone stays protected and functional. This final check takes less than a minute and catches any issues before they become problems.
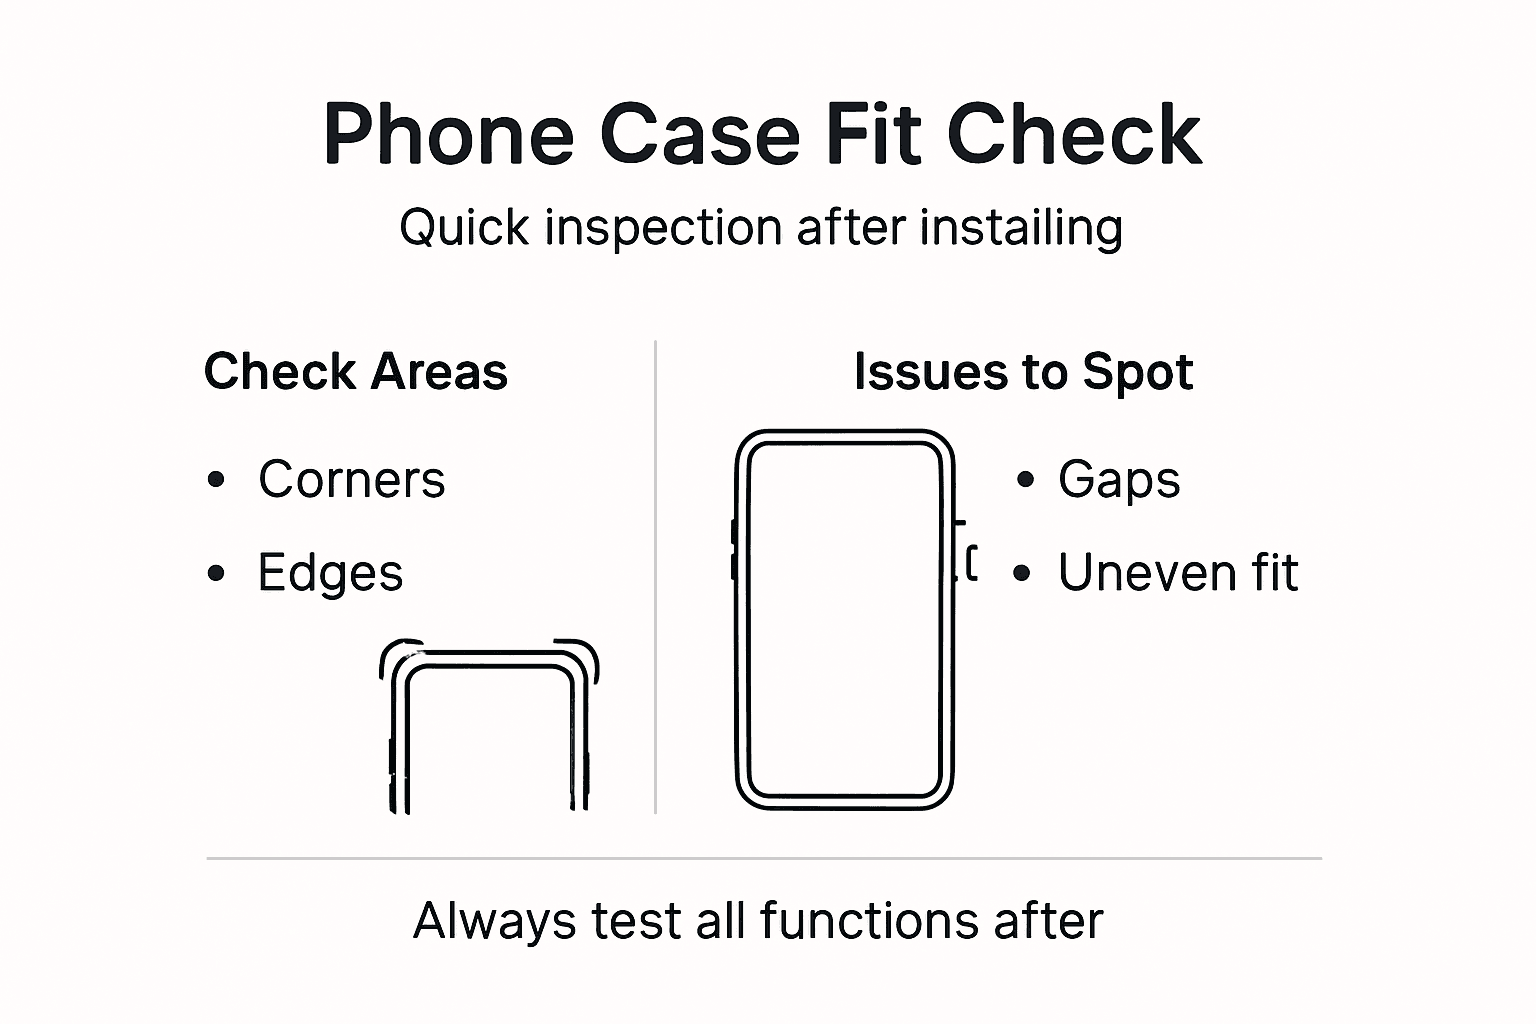
Start by performing a visual inspection of your entire phone. Walk around the case looking for gaps, uneven edges, or areas where the case doesn’t sit flush against your device. The fit should look neat and professional all the way around.
When conducting post-installation case inspections, check that all cutouts align perfectly with your phone’s features. Press each button through the case material to confirm they respond smoothly without sticking or jamming.
Verify these critical features work correctly:
- Power button responds instantly and clicks cleanly
- Volume buttons operate smoothly without resistance
- Charging port remains fully accessible without blockages
- Speaker grille allows sound to pass through clearly
- Camera lens has adequate clearance and protection
- Screen edges sit slightly proud of the case to prevent glass contact
Run your fingers around all four edges of the case carefully. You shouldn’t feel any loose areas, gaps, or sections where dust could creep inside. The case should feel solid and secure all the way around your device.
A proper inspection takes sixty seconds and prevents frustration later when buttons stick or dust accumulates underneath.
Hold your phone upright and gently twist it within the case. There should be no movement or rattling sounds. If you notice any shift, the case needs adjustment or may not fit your specific phone model correctly.
Test your phone’s touchscreen by swiping across the entire surface. The case shouldn’t interfere with responsiveness or cause accidental touches along the edges. Your phone should feel and operate exactly as it did before the replacement.
This table highlights the key checks for ensuring your new phone case fits and protects your device:
| Area to Inspect | What to Look For | Why It Matters |
|---|---|---|
| Button Response | Smooth, responsive presses | Ensures functionality |
| Port Cut-outs | Full, unobstructed access | Charging and audio work easily |
| Camera Clearance | No covering, raised edge | No camera scratches |
| Screen Edges | Slightly elevated above glass | Extra screen drop protection |
| Edge Seal | Even, no visible gaps | Prevents dust ingress |
Pro tip: Leave your newly cased phone sitting on a flat surface for thirty minutes before using it heavily, allowing any slight stretches in the case material to settle naturally.
Make Phone Case Replacement Faster and Easier with StudioShake
Replacing your phone case can be a tricky task especially for busy parents juggling many responsibilities. This article highlights common challenges like stubborn case removal, avoiding device scratches, and ensuring a perfect fit while maintaining your phone’s safety. At StudioShake, we understand the need for dependable protection combined with user-friendly design to make swaps quick and stress-free.

Experience the confidence that comes from using high-quality phone cases designed to fit precisely and protect thoroughly. Whether you need a soft silicone case for easy installation or a rigid protective shell, our selection supports your goal to replace your case safely and efficiently. Act now to enjoy hassle-free phone care by visiting StudioShake. Discover how our range of premium cases and accessories can simplify your phone protection routine today at StudioShake Official Website and begin your journey to a safer phone with expert guidance on how to remove your phone case safely. Take the first step towards effortless phone care now!
Frequently Asked Questions
How do I prepare for replacing my phone case?
To prepare for replacing your phone case, gather your new case, phone, a soft lint-free cloth, and potentially a plastic spoon for any stubborn cases. Organise these items on a clean, flat surface to streamline the process and prevent frustration during the swap.
What should I do if my old phone case is difficult to remove?
If your old phone case is difficult to remove, apply gentle pressure at the corners to flex it away from the phone. Avoid using excessive force; instead, work around the edges carefully, and if needed, warm the case slightly under running water to ease the removal.
How can I clean my phone effectively before installing the new case?
You can clean your phone effectively by using a lint-free cloth to wipe down the entire surface and then, for a deeper clean, dampening it slightly with warm water and mild soap. Make sure to avoid excess moisture around ports and to allow your phone to air dry completely for at least two minutes before installing the new case.
What steps should I follow to fit my new phone case securely?
To fit your new phone case securely, start by aligning one edge with your phone and slide it in gently. Press down progressively on all sides until the edges snap into place, ensuring that all buttons and cutouts align correctly, which should take around two minutes.
How can I check if my new phone case fits properly?
To check if your new phone case fits properly, perform a visual inspection for gaps and ensure that all port cutouts are easily accessible. Additionally, test the functionality of buttons and make sure there is no movement when you gently twist the phone within the case; this should only take about a minute.
What should I do if the case feels too tight after installation?
If the case feels too tight after installation, you can warm it slightly under warm running water for about ten seconds to make it more flexible. After this, try reinstalling your phone while the case is still warm for a better fit.
Recommended
- Phone Case Replacement Workflow for Busy Parents UK – StudioShake
- Top Phone Case Longevity Tips for Busy Parents UK Guide – StudioShake
- Effective Phone Cover Cleaning Process for Parents – StudioShake
- How to Remove Phone Case Safely for Families – StudioShake
- Szülinapi Dekoráció Lépésről Lépésre Gyerekpartira